Detailing Pipes
Pipes entering a pond need to be properly sealed to ensure there is no leakage around them.
There are 3 options for detailing pipes.
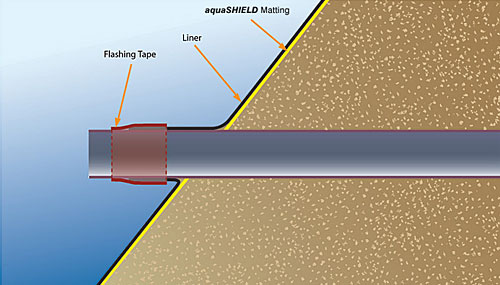
FormFlash

This is the simplest method for detailing pipes.
What you need:
QuickSeam FormFlash
QuickPrime Plus
QuickScrubber Pad
EasySealant
Method:
- Mark the position of the pipe on the liner
- Cut a round hole in the liner 50% of the diameter of the pipe. Do not cut a slit or cross as this could tear as you fit it over the pipe.
- Stretch the liner over and slide it down the pipe until the liner sits snugly against the bank of the pond (some liner should stretch a short way down the pipe).
- Add a small amount of the QuickPrime Plus onto the QuickScrubber Pad. Scrub this onto the liner around the pipe extrusion making sure it spreads at least 100mm from the pipe centre in all directions. Ensure the QuickPrime Plus is applied evenly, without streaks or puddling. The QuickPrime Plus should be allowed to go off until it is touch dry (test this with your finger, there should be no stringing when you pull your finger away).
- Cut a piece of QuickSeam FormFlash a little more than the circumference of the pipe.
- Peel off the backing paper from the FormFlash.
- Wrap the FormFlash around the pipe ensuring both some of the liner and the adjacent pipe are covered. The FormFlash should overlap itself so that there is a continuous seal around the pipe.
- Apply a continuous ring of EasySealant around both the top and bottom of the FormFlash where it meets the pipe and liner.
Mechanical Flange

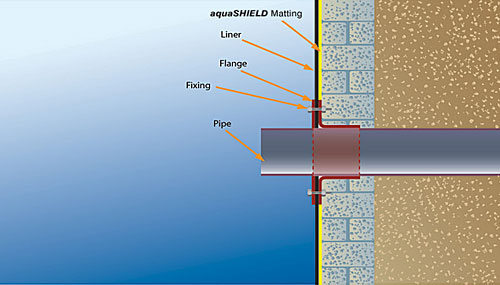
A mechanical flange is usually used where a pipe extrudes through a vertical wall.
The liner is clamped between the two parts of the flange, which are then bolted into the wall. When using this method for detailing pipes, Water Block should always be used around the bolts that penetrate the liner to ensure no water leaks around them.
Preformed Pipe Boot

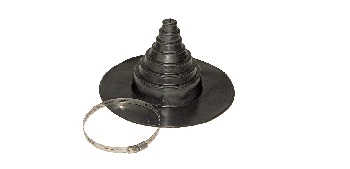
These are designed for use with rigid inlet and outlet pipes from 25-175mm in diameter.
What you need:
QuickSeam Pipe Flashing
QuickPrime Plus
Water Block
QuickScrubber Pad
QuickScrubber Handle
Seam Roller
EasySealant
Method:
- Mark the position of the pipe on the liner
- Cut a round hole in the liner 75% of the diameter of the pipe. Do not cut a slit or cross as this could tear as you fit it over the pipe.
- Stretch the liner over and slide it down the pipe until the liner sits snugly against the bank of the pond (some liner should stretch a short way down the pipe).
- Ensure that the liner is clean and dry.
- Cut away the rings of the QuickSeam Pipe Flashing so that the remaining hole matches the size of the pipe (the tighter the better, the Pipe Flashing has some give so can be stretched a little around the pipe).
- Add a small amount of the QuickPrime Plus onto the QuickScrubber Pad. Scrub this onto the liner around the pipe extrusion making sure it spreads at least 14” (36cm) from the pipe centre in all directions. Ensure the QuickPrime Plus is applied evenly, without streaks or puddling. The QuickPrime Plus should be allowed to go off until it is touch dry (test this with your finger, there should be no stringing when you pull your finger away).
- Add a continuous ring of Water Block around the pipe at the point where the top of the Pipe Boot will sit.
- Slide the Pipe Flashing over the pipe and down until the backing paper sits against the QuickPrime Plus on the liner.
- Carefully remove the backing paper from the flange of the Pipe Flashing (it is best to do this by pulling it off at a 45-degree angle to the tape) whilst simultaneously pressing the flange down onto the liner.
- Use the Seam Roller to firmly press the flange of the Pipe Flashing onto the liner. This ensures there are no bubbles and that the Pipe Flashing is evenly bonded to the liner. Do not use your hands as the pressure will not be distributed evenly.
- Slide the stainless steel tie over the Pipe Flashing and tighten around the smallest ring remaining to create a tight seal around the pipe. Excess steel can be trimmed off.
- Apply a continuous ring of EasySealant around both the top of the boot where it meets the pipe and around the base where it meets the liner.